Activity 1- How to use Computer/ Laptop/ Mobile
A computer is more than just another household appliance. The vast amount of information and possibilities can be overwhelming. But you can accomplish a lot with a computer, and using one can be a good experience. Let's walk through getting started with your first computer.
Turning on a computer for the first time can be different from one computer to the next. Your experience could be different from this lesson. It's OK to ask someone for help.
If you're using a desktop computer, you'll need to make sure that the keyboard, mouse, and monitor are plugged into the computer case before you continue.


Turning On a Computer
The very first step is to turn on the computer. To do this, locate and press the power button. It's in a different place on every computer, but it will have the universal power button symbol (shown below).


Once turned on, your computer takes time before it's ready to use. You may see a few different displays flash on the screen. This process is called booting up, and it can take anywhere from 15 seconds to several minutes.
Once the computer has booted up, it may be ready to use, or it may require you to log in. This means identifying yourself by typing your user name or selecting your profile, then typing your password. If you've never logged in to your computer before, you may need to create an account.
The Keyboard and Mouse
You interact with a computer mainly by using the keyboard and mouse, or a trackpad on laptops. Learning to use these devices is essential to learning to use a computer. Most people find it comfortable to place the keyboard on the desk directly in front of them and the mouse to one side of the keyboard.


The mouse controls the pointer on the screen. Whenever you move the mouse across the desk, the pointer will move in a similar manner. A mouse usually has two buttons, which are referred to as the left button and the right button. You will often interact with the computer by moving the mouse pointer over something on the computer screen, then clicking one of the buttons.

On laptops, you can use the trackpad, located below the keyboard, instead of a mouse. Simply drag your finger across the trackpad to move the pointer on the screen. Some trackpads do not have buttons, so you'll either press or tap the trackpad to click.

The keyboard allows you to type letters, numbers, and words into the computer. Whenever you see a flashing vertical line—called the cursor—you can start typing.
Turning On a Computer
The very first step is to turn on the computer. To do this, locate and press the power button. It's in a different place on every computer, but it will have the universal power button symbol (shown below).
Once turned on, your computer takes time before it's ready to use. You may see a few different displays flash on the screen. This process is called booting up, and it can take anywhere from 15 seconds to several minutes.
Once the computer has booted up, it may be ready to use, or it may require you to log in. This means identifying yourself by typing your user name or selecting your profile, then typing your password. If you've never logged in to your computer before, you may need to create an account.
The Keyboard and Mouse
You interact with a computer mainly by using the keyboard and mouse, or a trackpad on laptops. Learning to use these devices is essential to learning to use a computer. Most people find it comfortable to place the keyboard on the desk directly in front of them and the mouse to one side of the keyboard.
The mouse controls the pointer on the screen. Whenever you move the mouse across the desk, the pointer will move in a similar manner. A mouse usually has two buttons, which are referred to as the left button and the right button. You will often interact with the computer by moving the mouse pointer over something on the computer screen, then clicking one of the buttons.
On laptops, you can use the trackpad, located below the keyboard, instead of a mouse. Simply drag your finger across the trackpad to move the pointer on the screen. Some trackpads do not have buttons, so you'll either press or tap the trackpad to click.
The keyboard allows you to type letters, numbers, and words into the computer. Whenever you see a flashing vertical line—called the cursor—you can start typing.
How to Use an Android Phone
Smartphones have become a swiss army knife of features that have surpassed the versatility of other kinds of phones. As a result, smartphones have increased in complexity which requires more time to understand how to get the most out of your device. Aside from making phone calls and sending text messages, you can take advantage of expandable features your phone is capable of.
Configuring Your New Phone

Unpack your device. Inspect your device to locate the physical features of your phone. You will need to locate the buttons for power and sound volume as well as slots for power and audio cables. Also note the location of the Action Bar that assists with navigation on your phone. This will consist of a Home button with a house icon, a Back button indicated by an arrow and a Recent Apps button that lets you scroll through recently opened applications. This may not appear until the device is turned on based on the manufacturer. You will need to plug a charger into the phone before turning it on as it will not have enough power out of the box.

Add a SIM card. This is required to connect your phone to your service provider. The SIM card slot may vary depending on your phone manufacturer. Some phones place the SIM card slot behind the battery, under a flap or elsewhere on the phone. Be sure to consult your user’s manual to indicate where to insert the SIM card.

Add an SD card. An SD card is removable storage that can expand the total amount of space. This is entirely optional, however it may be necessary for storing more apps and other multimedia on the phone than what it is initially capable of storing. An SD card slot may appear under the battery cover and may support an SD card, mini SD card or micro SD card which depicts it’s physical size. Check with the user’s manual of your phone to see what your phone supports.
- It is possible that your phone may not support an SD card and may not have any solutions for expanding storage.
Turn on your phone to initiate first time setup. Press and hold the power button for a few seconds to turn the phone on. You will see a boot up sequence that will take a few seconds to start your phone. After the boot up sequence, you will go through a first time setup. Follow the on-screen prompts to complete the setup process.

Choose a language. This will change the default language that appears on your phone and may change the language options for certain apps. This can be changed later in your phone’s settings.

Choose a Wifi network. If you have a data plan, you will already be able to connect online. However if you want to use a stronger network connection or if you want to avoid using your data plan, you can connect to a local Wi-fi service. Slide your finger up and down to choose between wi-fi spots that are available, then tap on a device to connect to it.
- If the Wi-fi connection shows that it is secured, you will need to enter a passcode to connect to it. Tap on the text field to bring up a keyboard and enter the passcode to connect to it.
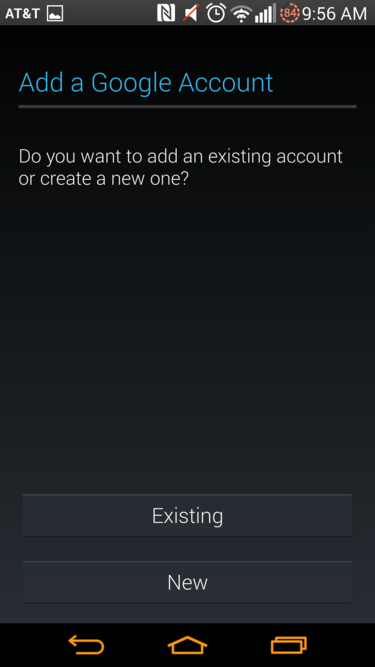
Create or log-in to your Google account. The Android platform is created by Google and ties together their services such as the Google Play store, Gmail, YouTube and more with a free Google account. Follow the on-screen prompts to create a Google account or log in to an existing account. Your account will then be linked to your phone.
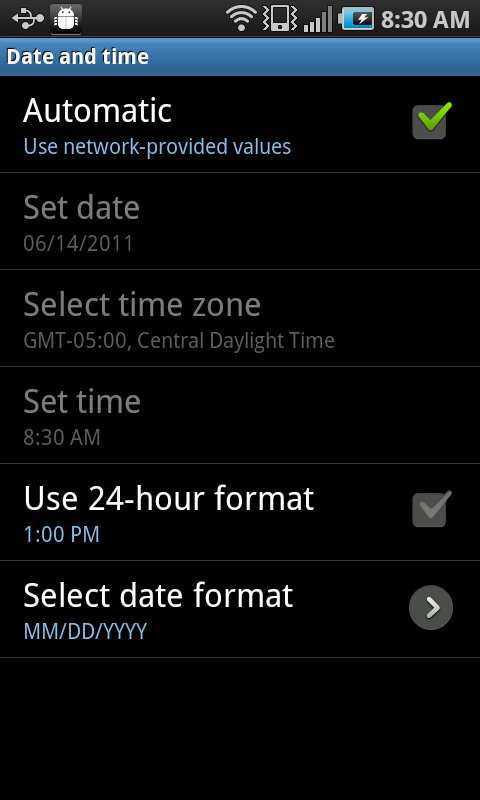
Set the date and time. You can choose to have it connect online to set the time or you can set the time manually.
- If you are configuring the time manually, choose the date, timezone and time display format for your phone.
Use the settings app to correct or configure your phone. The settings app allows you to adjust almost all aspects of your phone including app settings, notifications, sounds, languages and more. When you arrive on the home screen, tap the icon that looks like a grid to bring up the app drawer, where your apps will be listed. Slide your finger left or right to scroll through apps that are installed on your phone. Locate and tap on the “Settings” app to open it.
- You can tap on Wi-Fi, Bluetooth and Mobile Data to change settings, create a new connection, or toggle the connection on and off. Wi-fi connections take precedence over your Mobile Data if the Wi-fi connection is available.
- You can personalize your ringtone under Sound>Phone ringtone. You can also adjust the volume of your ringer and multimedia sliders separately under Sound>Volumes.

Secure your phone. You may opt to activate a lock screen on your phone. This will be useful in case your phone gets lost or stolen as this will prevent others from accessing your phone. Tap the “Settings” app icon then navigate to “Security” and choose to lock your screen through one of several methods such as a password, PIN number or drawing a pattern by sliding your finger against a grid in a set pattern. Follow the onscreen prompts to complete the process.
- Be sure to remember how to bypass your lock screen as you may risk locking yourself out of your phone. You may have to perform a factory reset on your phone which means you will lose all data stored on the phone.
- Once the process is completed, you will be prompted to enter your preferred security code to unlock the phone if it is put to sleep. Press the power button on your phone to put it in sleep mode which will also lock the phone. Press the power button when in sleep mode to wake up the phone. Follow an on screen prompt to unlock the phone. You will then be prompted for the passcode to log in to your phone.

Good
ReplyDelete